Java IO学习-字节流
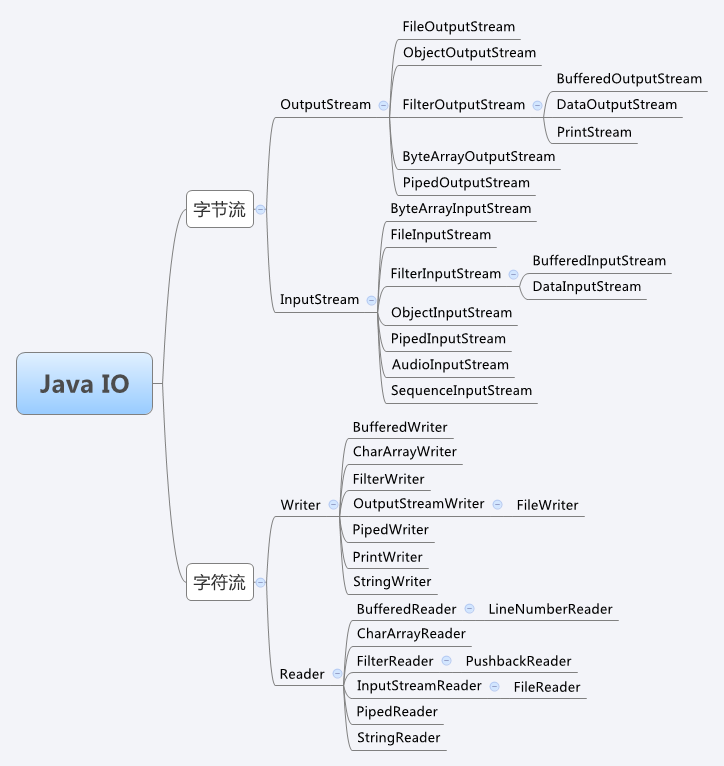
IO流工具类一览
一切文件数据(文本、图片、视频等)在存储时,都是可以通过字节流进行操作
字节流抽象类
所有的字节流有都继承自 InputStream、OutputStream 这两个抽象类
OutputStream 的成员方法
//关闭此输出流并释放与此流相关联的任何系统资源。
void close()
//刷新此输出流并强制任何缓冲的输出字节被写出。
void flush()
//将 b.length字节从指定的字节数组写入此输出流。
void write(byte[] b)
//字节数组 从指定的偏移off开始输出 len个字节,到此输出流。
void write(byte[] b, int off, int len)
//将指定的字节写入此输出流。
abstract void write(int b)
InputStream 的成员方法
//返回从该输入流中可以读取(或跳过)的字节数的估计值,而不会被下一次调用此输入流的方法阻塞。
int available()
//关闭此输入流并释放与流相关联的任何系统资源。
void close()
//标记此输入流中的当前位置。
void mark(int readlimit)
//测试这个输入流是否支持 mark和 reset方法。
boolean markSupported()
//从输入流读取数据的下一个字节。
abstract int read()
//从输入流读取一些字节数,并将它们存储到缓冲区 b 。
int read(byte[] b)
//从输入流读取最多 len字节的数据到一个字节数组。
int read(byte[] b, int off, int len)
//将此流重新定位到上次在此输入流上调用 mark方法时的位置。
void reset()
//跳过并丢弃来自此输入流的 n字节数据。
long skip(long n)
这个字节流抽象类有如下的实现类(这里只介绍常用的,音频输入流这种用到再补充)
- ByteArrayOutputStream、ByteArrayInputStream:内存操作流
- FileOutputStream、FileInputStream:从文件系统中的文件获取输入字节(用于读取诸如图像数据的原始字节流)
- ObjectOutputStream、ObjectInputStream:对象流(用来实现序列化、反序列化)
- PipedOutputStream、PipedInputStream:管道流
- FilterOutputStream、FilterInputStream :带过滤器的流
内存操作流
参考资料 Java IO操作:内存操作流
这个 ByteArrayInputStream、ByteArrayOutputStream 是线程安全的
之前的程序中,输出输入都是从文件中来的,当然,也可以将输出的位置设置在内存之上。此时就要使用 ByteArrayInputStream、ByteArrayOutputStream 来完成输入、输出的功能了。
ByteArrayInputStream 的主要功能是完成将内容写入到内存之中,而 ByteArrayOutputStream 的主要功能是将内存中的数据输出。
它的作用场景:
1、假设已经有一个写好的压缩函数,该函数接收2个参数:一个是输入流对象,一个是输出流对象,它从输入流对象中读取数据,并将压缩后的结果写入输出流对象。程序需要将一台计算机的屏幕图形通过网络不断传送到另外的计算机上,为了节省带宽,我们就需要对图像的像素数据进行压缩后,在通过网络发送出去的。如果没有内存虚拟文件,我们就必须先将一副屏幕图像的像素数据写入到硬盘上的一个临时文件,再以这个文件作为输入流对象去调用那个压缩函数,接着又从压缩函数生成的压缩文件中读取压缩后的数据,再通过网络发送出去,最后删除压缩前后所生成的两个临时文件。可见这样的效率是非常低的。这种时候就可以使用内存操作流来暂存文件
2、使用深缓存的时候
构造方法:
public ByteArrayInputStream(byte[] buf)
创建一个 ByteArrayInputStream,使用 buf 作为缓冲区数组(实际上就是通过构造方法上将数据传入到内存之中)
ByteArrayOutputStream:输出就是从内存中写出数据。
public static void main(String args[]) {
    String str = "HELLOWORLD";        // 定义一个字符串,全部由大写字母组成
    ByteArrayInputStream bis = null;    // 内存输入流
    ByteArrayOutputStream bos = null;    // 内存输出流

    bis = new ByteArrayInputStream(str.getBytes());    // 向内存中输入内容

    bos = new ByteArrayOutputStream();    // 准备从内存 ByteArrayInputStream 中读取内容

    int temp = 0;
    while ((temp = bis.read()) != -1) {
        char c = (char) temp;    // 读取的数字变为字符
        bos.write(Character.toLowerCase(c));    // 将字符变为小写
    }

    // 所有的数据就全部都在 ByteArrayOutputStream 中
    String newStr = bos.toString();    // 取出内容

    try {
        bis.close();
        bos.close();
    } catch (IOException e) {
        e.printStackTrace();
    }
    System.out.println(newStr);
}
文件流
//字节数组 从指定的偏移off开始输出 len个字节,到此文件输出流
void write(byte[] b, int off, int len)
实际上在文件内容写入硬盘是经过一系列调用的
Java程序-->
    JVM(java虚拟机)-->
        OS(操作系统)-->
            OS 调用写数据的 api-->
                把数据写入到文件中
FileOutputStream
- 创建一个 FileOutputStream 对象,构造方法中传递写入的目的地
- 调用 FileOutputStream 对象中的 write 方法把数据写入到文件中
- 释放资源(流使用会占用一定的内存,使用完毕要把内存清空,提高程序的效率)
String filename = "a.txt";
File path = new File("C:\\Users\\alsritter\\Desktop",filename);
FileOutputStream fos = new FileOutputStream(path);
fos.write("hello java io".getBytes());
fos.close();
也可以单独设置偏移量之类的
byte[] bytes = {65,74,21,90,0,0,0,0,0,0,0,0,0,0,0,0};
// write(byte b[], int off, int len)
fos.write(bytes,0,3);
注意:默认写入都是直接覆盖的 如果要追加写入则实例化时要开启追加写入
// 实例化时 加上true表示启动追加写入
FileOutputStream fos = new FileOutputStream(path,true);
FileInputStream
- 创建 FileInputStream 对象,构造方法中绑定要读取的数据源
- 使用 FileInputStream 对象中的方法 read,读取文件
- 释放资源
关键是使用 buffer 来加快读取速度
public class learn01 {
    public static void main(String[] args) throws IOException {
        String filename = "a.txt";
        File path = new File("C:\\Users\\alsritter\\Desktop", filename);

        FileInputStream fis = new FileInputStream(path);
        // 注意 read() 只能读取一个字节(文件末尾返回的是-1)

        // read(byte[] b) 可以读取多个字节到缓冲数组上 1024=1k
        byte[] buffer = new byte[1024];

        int len;
        // 这里的 len 返回的是有效读取的个数
        while ((len = fis.read(buffer)) != -1) {
            // byte[] 转String
            System.out.println(len);

            // Byte 转 Spring
            // String 只转换有效的字节(像后面如果填不满(全是0)却直接丢到 String 里实例化就浪费了空间)
            System.out.println(new String(buffer, 0, len));
            System.out.println("***********分割线***********");
        }

    }
}
因为使用的字节流,字节流不识别换行符、空格这些,所以每次读取都是直接填满缓存区的(如下图)

文件复制案例
public class learn01 {
    public static void main(String[] args) throws IOException {
        String filename = "temp.png";
        String filePath = "C:\\Users\\alsritter\\Desktop";
        File path = new File(filePath,filename);

        //用来测试程序的效率,所以读取前后时间
        long s = System.currentTimeMillis();

        //先读取
        FileInputStream fis = new FileInputStream(path);
        //输出文件
        FileOutputStream fos = new FileOutputStream(new File(filePath,"copy_"+ path.getName()));

        byte[] buffer = new byte[1024];
        int len;
        while((len = fis.read(buffer))!=-1){
            fos.write(buffer,0,len);
        }

        fos.close();
        fis.close();
        // 返回当前毫秒
        long e = System.currentTimeMillis();
        System.out.println("共耗时:"+(e - s)+"毫秒");
    }
}
对象流(序列化)
实际上所谓的序列化反序列化就是下面类
- ObjectOutputStream:序列化
- ObjectInputStream:反序列化
ObjectOutputStream 序列化步骤
- 给需要序列化的对象加上 Serializable 接口
- 创建 ObjectOutputStream 对象,构造方法中传递字节输出流
- 使用 ObjectOutputStream 对象中的 writeObject,把对象写入到文件中
- 释放资源
/**
 * 测试序列化
 * 需要在这里实现序列化接口,否则会无法序列化报错
 * 当进行序列化和反序列化的时候,就会检查类上是否存在这个标记
 * 有:就可以序列化和反序列化、
 * 没有会抛出 NotSerializableException 异常
 *
 * @author alsritter
 * @version 1.0
 **/
public class Student implements Serializable {
    public int id;
    protected String name;
    private int age;
    public Date date;

    public Student(int id, String name, int age, Date date) {
        this.id = id;
        this.name = name;
        this.age = age;
        this.date = date;
    }

}
然后就可以直接输出到文件里面了
public class learn01 {

    public static void main(String[] args) throws IOException {
        String name = "a.txt";
        String path = "C:\\Users\\alsritter\\Desktop";
        File file = new File(path, name);

        //用来测试程序的效率,所以读取前后时间
        long s = System.currentTimeMillis();

        ObjectOutputStream outputStream = new ObjectOutputStream(new FileOutputStream(file));
        Student student = new Student(1, "张三", 20, new Date());
        outputStream.writeObject(student);
        outputStream.close();

        // 返回当前毫秒
        long e = System.currentTimeMillis();
        System.out.println("共耗时:" + (e - s) + "毫秒");
    }
}
这里补充一个 static 关键字 与 transient 关键字的知识点
static关键字:静态关键字
- 静态关键字优先于非静态加载到内存中
- 被 static 修饰的成员变量 不能被序列化,序列化的都是对象,而被静态关键字修饰的是不属于对象的,其是被所有对象共享的
注:不能被序列化的表现,就是那个值为默认值(例如 0 或者 null)
transient关键字:瞬态关键字 如果一个用户有一些敏感信息(如密码,银行卡号等),为了安全起见,不希望在网络操作(主要涉及到序列化操作,本地序列化缓存也适用)中被传输,这些信息对应的变量就可以加上 transient 关键字。换句话说,这个字段的生命周期仅存于调用者的内存中而不会写到磁盘里持久化。
- 通过这个关键字修饰的变量也 不能被序列化
- 如果以后想要哪个变量不被序列化就使用这个关键字修饰
ObjectInputStream 反序列化
- 创建 ObjectInputStream 对象,构造方法中传递字节输入流
- 使用 ObjectInputStream 对象中的 readObject,读取对象
- 释放资源
public class learn01 {

    public static void main(String[] args) throws IOException, ClassNotFoundException {
        String name = "a.txt";
        String path = "C:\\Users\\alsritter\\Desktop";
        File file = new File(path, name);

        //用来测试程序的效率,所以读取前后时间
        long s = System.currentTimeMillis();

        ObjectInputStream inputStream = new ObjectInputStream(new FileInputStream(file));
        Student student = (Student) inputStream.readObject();
        inputStream.close();
        System.out.println(student);

        // 返回当前毫秒
        long e = System.currentTimeMillis();
        System.out.println("共耗时:"+(e - s)+"毫秒");
    }
}
注意!!当修改了对象类之后,之前序列化的文件就不能再读取了,否则会报错,需要重新序列化
序列化 serialVersionUID
在 JDK 基本所有的只要实现了这个 Serializable 接口的内置对象都有这个 serialVersionUID,那这个 serialVersionUID 是干什么的呢?
// 如下 HashMap 的
private static final long serialVersionUID = 362498820763181265L;
实际就是用来标识对象是否可以反序列化的
serialVersionUID 是在 Java 序列化、反序列化对象时起作用的一个字段。Java 的序列化机制是通过判断类的 serialVersionUID 来验证版本一致性的。
在进行反序列化时,JVM 会把传来的字节流中的 serialVersionUID 与本地相应实体类的 serialVersionUID 进行比较,如果相同就认为是一致的,可以进行反序列化,否则就会出现序列化版本不一致的异常,即 InvalidClassException
何时使用呢?
前面说过当修改了对象之后则无法反序列化了,那如何标识不兼容了呢?这时就可以采用 serialVersionUID 来控制版本是否兼容,若修改的程序是向后兼容的(就是不改这个类),则不修改 serialVersionUID;反之,则提高 serialVersionUID 的值
所以一般用这个 serialVersionUID 来做版本号
字节管道流
参考资料 Java IO7:管道流、对象流 参考资料 Java Pipe(管道)
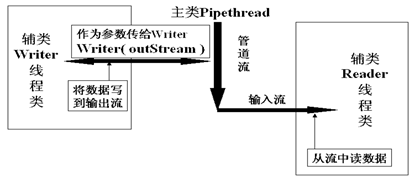
管道流也分为字节流(PipedInputStream、PipedOutputStream)和字符流(PipedReader、PipedWriter)。比如一个 PipedInputStream 必须和一个 PipedOutputStream 对象进行连接而产生一个通信管道,PipedOutputStream 向管道中写入数据,PipedInputStream 从管道中读取数据。
Java 里的管道输入流 PipedInputStream 与管道输出流 PipedOutputStream 实现了类似管道的功能,用于将数据从一个线程传输到另一个线程。两个线程之间的同步由阻塞读和写来处理。
管道 I/O 基于生产者 - 消费者模式,其中生产者产生数据,而消费者消费数据。在管道I/O中,创建两个流代表管道的两端。 PipedOutputStream 对象表示流的一端,PipedInputStream 对象则表示流的另一端。使用两个对象的 connect() 方法连接两端。
还可以通过在创建另一个对象时将一个对象传递给构造函数来连接它们。以下代码显示了创建和连接管道两端的两种方法:
第一种方法创建管道输入和输出流并连接它们。 它使用
connect()方法连接两个流。PipedInputStream pis = new PipedInputStream();
PipedOutputStream pos = new PipedOutputStream();
pis.connect(pos); /* Connect the two ends */第二种方法创建管道输入和输出流并连接它们。 它通过将输入管道流传递到输出流构造器来连接两个流。
PipedInputStream pis  = new PipedInputStream();
PipedOutputStream pos  = new PipedOutputStream(pis);
管道流的工作如下图所示:
下面是具体使用例子:
既然管道流的作用是用于线程间的通信,那么势必有发送线程和接收线程,两个线程通过管道流交互数据。首先写一个发送数据的线程:
public class Sender implements Runnable {
    private PipedOutputStream out = new PipedOutputStream();

    public PipedOutputStream getOutputStream() {
        return out;
    }

    public void run() {
        String str = "你好,这里是管道流";
        try {
            out.write(str.getBytes()); // 向管道流中写入数据(发送)
            out.close();
        }
        catch (IOException e) {
            e.printStackTrace();
        }
    }
}
既然有一个发送数据的线程了,接下来来一个接收数据的线程:
public class Receiver implements Runnable {
    private PipedInputStream in = new PipedInputStream();

    public PipedInputStream getInputStream() {
        return in;
    }

    public void run() {
        String s = null;
        byte b0[] = new byte[1024];

        try {
            int length = in.read(b0);
            if (-1 != length)
            {
                s = new String(b0, 0 , length);
                System.out.println("收到了以下信息:" + s);
            }
            in.close();
        } catch (IOException e) {
            e.printStackTrace();
        }
    }
}
写一个 main 线程,利用管道输出流的 connect 方法连接管道输出流和管道输入流:
public static void main(String[] args) {
    try {
        Sender sender = new Sender();
        Receiver receiver = new Receiver();

        Thread senderThread = new Thread(sender);
        Thread receiverThread = new Thread(receiver);

        PipedOutputStream out = sender.getOutputStream(); // 写入
        PipedInputStream in = receiver.getInputStream(); // 读出

        out.connect(in);// 将输出发送到输入

        senderThread.start();
        receiverThread.start();
    }
    catch (IOException e) {
        e.printStackTrace();
    }
}
注意:默认 PipedInputStream 运用的是一个 1024 字节固定大小的循环缓冲区,写入 PipedOutputStream 的数据实际上保存到了对应的 PipedInputStream 的内部缓冲区。PipedInputStream 执行读操作时,读取的数据实际上来自这个内部缓冲区。如果对应的 PipedInputStream 输入缓冲区已满,任何企图写入 PipedOutputStream 的线程都将被阻塞。而且这个写操作线程将一直阻塞,直至出现读取 PipedInputStream 的操作从缓冲区删除数据。
这意味着,向 PipedOutputStream 写入数据的线程不应该是负责从对应 PipedInputStream 读取数据的唯一线程(所以这里开了两个线程分别用于读写)。假定 t 线程试图一次对 PipedOutputStream 的 write() 方法的调用中向对应的 PipedOutputStream 写入 2000 字节的数据,在 t 线程阻塞之前,它最多能够写入 1024 字节的数据(PipedInputStream 内部缓冲区的大小)。然而一旦 t 被阻塞,读取 PipedInputStream 的操作就再也不能出现了,因为 t 是唯一读取 PipedInputStream 的线程,这样,t 线程已经完全被阻塞。
但是可以在实例化时指定这个缓冲区大小,以下代码创建缓冲区容量为 2048 字节的管道输入流。
PipedOutputStream pos  = new PipedOutputStream();
PipedInputStream pis  = new PipedInputStream(pos, 2048);
字节缓冲流
缓冲流的基本原理就是在创建流对象时,会创建一个内置的默认大小的缓冲区数组,通过缓冲区读写,减少系统IO次数,从而提高读写的效率
BufferedInputStream
//创建一个有32字节的缓存区
BufferedInputStream(InputStream in)
//创建一个有size大小字节的缓存区
BufferedInputStream(InputStream in, int size)
read 方法传递的 buf 和 BufferedInputStream 构造方法的 buf参数有什么区别(如下)
FileInputStream.read(byte[] buf)
// 这两个 read 方法的作用相同
BufferedInputStream.read(byte[] buf)

// 上面的 buf 参数和这个 size参数有什么区别?
public BufferedInputStream(InputStream in, int size)
关键就在于理解这两个 buffer 的区别(内部 buffer 和传入 buffer)
BufferedInputStream 内部的 buffer(构造方法自己去设置大小)实际上就是使用这个 buffer 当作容器传给 JVM,JVM 再去传给 OS 取得大量数据,再返回来,用于减少 JVM 调用 OS 去取得数据的次数
而通过 read(byte[] buf) 传入的 外部buffer 只是用来减少频繁调用 read 方法,一次把得到的数据传到这个 外部buffer 里面,省的每次只取得一个字节,这与内部的 buffer 实际无关。因为 BufferedInputStream 内部的 buffer 已经取得了数据,所以一次只给一个字节和直接一次性传给这个 外部buffer 实际没有什么区别
所以这个 read(byte[] buf) 只是循环调用 read() 方法来填满这个 外部buffer,所以 FileInputStream 的 read(byte[] buf) 本质还是一个字节一个字节的取得
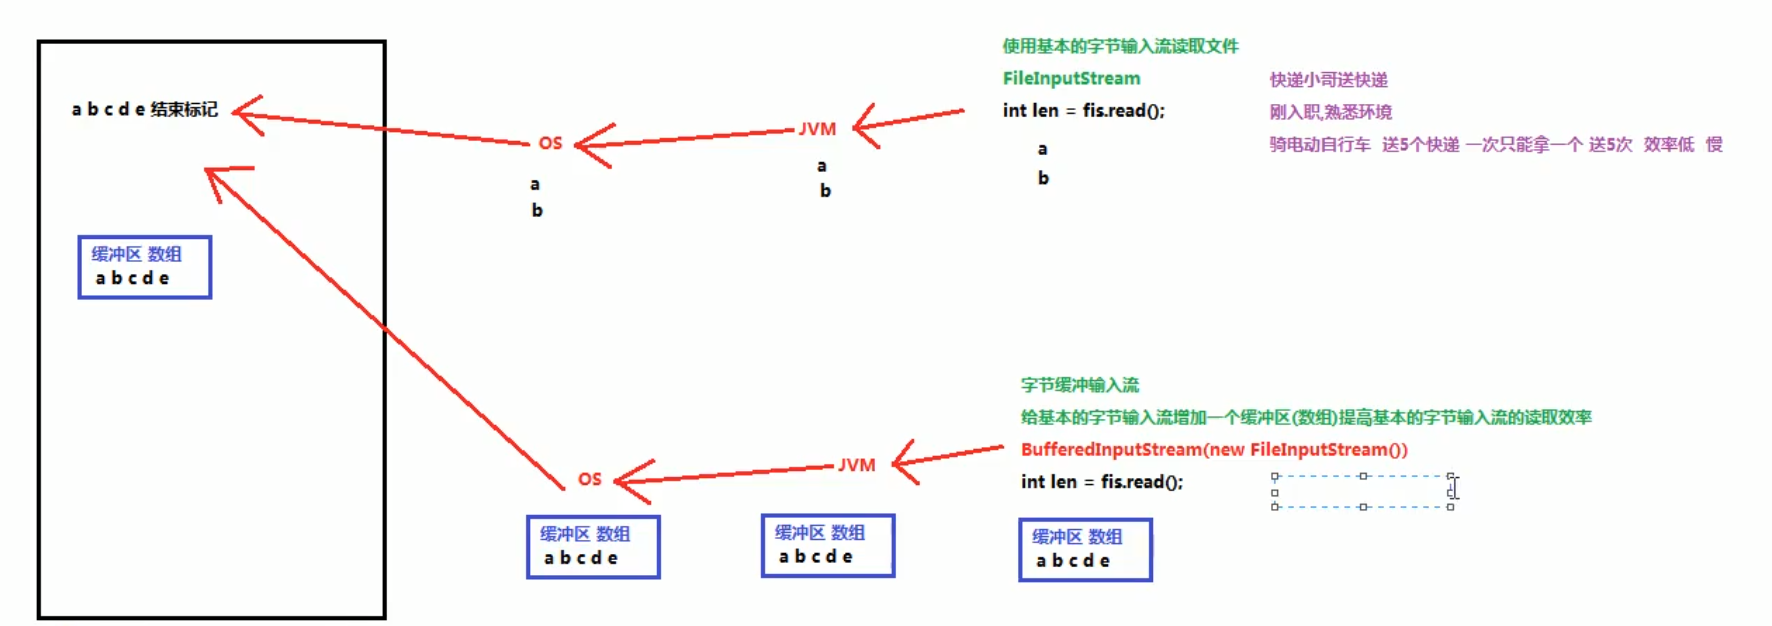
看上图就能很好的理解缓冲流的关系(虽然图上写的是字符流,但是原理是一样的)
public class learn01 {

    public static void main(String[] args) throws IOException {
        String name = "a.txt";
        String path = "C:\\Users\\alsritter\\Desktop";
        File file = new File(path, name);

        //用来测试程序的效率,所以读取前后时间
        long s = System.currentTimeMillis();

        FileInputStream fileInputStream = new FileInputStream(file);
        BufferedInputStream bufferedInputStream = new BufferedInputStream(fileInputStream, 1024);
        byte[] buffer = new byte[1024];
        int len;
        while ((len = bufferedInputStream.read(buffer))!=-1){
            System.out.println(new String(buffer,0,len));
        }


        // 返回当前毫秒
        long e = System.currentTimeMillis();
        System.out.println("共耗时:" + (e - s) + "毫秒");
    }
}
BufferedOutputStream
FileOutputStream 实际上与 FileInputStream 一样,一次只能写入一个字节;至于 write(byte[] b) 方法和这个缓存的区别直接参考上面就行了,本质都是一样的
//刷新缓冲输出流。
void flush()
//从指定的字节数组写入 len个字节,从偏移 off开始到缓冲的输出流。
void write(byte[] b, int off, int len)
//将指定的字节写入缓冲的输出流。
void write(int b)
- 创建FileOutputStream对象,构造方法中绑定要输出的目的地
- 创建BufferedOutputStream对象,传入上面创建的对象
- 使用BufferedOutputStream对象的write
- flush
- close
public class learn01 {

    public static void main(String[] args) throws IOException {
        String name = "a.txt";
        String path = "C:\\Users\\alsritter\\Desktop";
        File file = new File(path, name);

        //用来测试程序的效率,所以读取前后时间
        long s = System.currentTimeMillis();


        FileInputStream fileInputStream = new FileInputStream(file);
        FileOutputStream fileOutputStream = new FileOutputStream(path+"\\copy_temp.txt");

        BufferedInputStream bufferedInputStream = new BufferedInputStream(fileInputStream,1024);
        BufferedOutputStream bufferedOutputStream = new BufferedOutputStream(fileOutputStream,1024);
        byte[] buffer = new byte[1024];
        int len;
        while ((len = bufferedInputStream.read(buffer))!=-1){
            bufferedOutputStream.write(buffer,0,len);
        }

        bufferedOutputStream.close();
        bufferedInputStream.close();
        fileOutputStream.close();
        fileInputStream.close();


        // 返回当前毫秒
        long e = System.currentTimeMillis();
        System.out.println("共耗时:"+(e - s)+"毫秒");
    }
}
InputStream 的装饰器模式
下面这段整篇复制自: Filter模式
当我们需要给一个 “基础” InputStream 附加各种功能时,我们先确定这个能提供数据源的 InputStream,因为我们需要的数据总得来自某个地方,例如,FileInputStream,数据来源自文件:
InputStream file = new FileInputStream("test.gz");
紧接着,我们希望 FileInputStream 能提供缓冲的功能来提高读取的效率,因此我们用 BufferedInputStream 包装这个 InputStream,得到的包装类型是 BufferedInputStream,但它仍然被视为一个 InputStream:
InputStream buffered = new BufferedInputStream(file);
最后,假设该文件已经用 gzip 压缩了,我们希望直接读取解压缩的内容,就可以再包装一个 GZIPInputStream:
InputStream gzip = new GZIPInputStream(buffered);
无论我们包装多少次,得到的对象始终是InputStream,我们直接用InputStream来引用它,就可以正常读取:
┌─────────────────────────┐
│GZIPInputStream          │
│┌───────────────────────┐│
││BufferedFileInputStream││
││┌─────────────────────┐││
│││   FileInputStream   │││
││└─────────────────────┘││
│└───────────────────────┘│
└─────────────────────────┘
上述这种通过一个“基础”组件再叠加各种 “附加” 功能组件的模式,称之为 Filter模式(或者装饰器模式:Decorator)。它可以让我们通过少量的类来实现各种功能的组合:
                 ┌─────────────┐
                 │ InputStream │
                 └─────────────┘
                       ▲ ▲
┌────────────────────┐ │ │ ┌─────────────────┐
│  FileInputStream   │─┤ └─│FilterInputStream│
└────────────────────┘ │   └─────────────────┘
┌────────────────────┐ │     ▲ ┌───────────────────┐
│ByteArrayInputStream│─┤     ├─│BufferedInputStream│
└────────────────────┘ │     │ └───────────────────┘
┌────────────────────┐ │     │ ┌───────────────────┐
│ ServletInputStream │─┘     ├─│  DataInputStream  │
└────────────────────┘       │ └───────────────────┘
                             │ ┌───────────────────┐
                             └─│CheckedInputStream │
                               └───────────────────┘
类似的,OutputStream也是以这种模式来提供各种功能:
                  ┌─────────────┐
                  │OutputStream │
                  └─────────────┘
                        ▲ ▲
┌─────────────────────┐ │ │ ┌──────────────────┐
│  FileOutputStream   │─┤ └─│FilterOutputStream│
└─────────────────────┘ │   └──────────────────┘
┌─────────────────────┐ │     ▲ ┌────────────────────┐
│ByteArrayOutputStream│─┤     ├─│BufferedOutputStream│
└─────────────────────┘ │     │ └────────────────────┘
┌─────────────────────┐ │     │ ┌────────────────────┐
│ ServletOutputStream │─┘     ├─│  DataOutputStream  │
└─────────────────────┘       │ └────────────────────┘
                              │ ┌────────────────────┐
                              └─│CheckedOutputStream │
                                └────────────────────┘
FilterInputStream
Java的 IO 标准库使用 Filter模式为 InputStream 和 OutputStream 增加功能:
- 可以把一个 InputStream 和任意个 FilterInputStream 组合;
- 可以把一个 OutputStream 和任意个 FilterOutputStream 组合。
这个 FilterInputStream 就是 Decorator 模式
自己编写 FilterInputStream,以便可以把自己的 FilterInputStream “叠加” 到任何一个InputStream中。
下面的例子演示了如何编写一个 CountInputStream,它的作用是对输入的字节进行计数:
class CountInputStream extends FilterInputStream {
    private int count = 0;

    CountInputStream(InputStream in) {
        super(in);
    }

    public int getBytesRead() {
        return this.count;
    }

    public int read() throws IOException {
        int n = in.read();
        if (n != -1) {
            this.count ++;
        }
        return n;
    }

    public int read(byte[] b, int off, int len) throws IOException {
        int n = in.read(b, off, len);
        if (n != -1) {
            this.count += n;
        }
        return n;
    }
}
使用测试
public class Main {
    public static void main(String[] args) throws IOException {
        byte[] data = "hello, world!".getBytes("UTF-8");
        try (CountInputStream input = new CountInputStream(new ByteArrayInputStream(data))) {
            int n;
            while ((n = input.read()) != -1) {
                System.out.println((char)n);
            }
            System.out.println("Total read " + input.getBytesRead() + " bytes");
        }
    }
}
注意到在叠加多个 FilterInputStream,只需要持有最外层的 InputStream,并且,当最外层的 InputStream 关闭时(在 try(resource) 块的结束处自动关闭),内层的 InputStream 的 close() 方法也会被自动调用,并最终调用到最核心的“基础” InputStream,因此不存在资源泄露。